Deploying a Static Website on Amazon S3: A Step-by-Step Guide


Table of contents
- Step 1: Create an S3 Bucket
- Step 2: Configure the Bucket for Static Website Hosting
- Step 3: Upload your Website Files to the S3 Bucket
- Step 4: Configure Bucket Permissions
- Step 5: Enable Static Website Hosting and Obtain Endpoint URL
- Step 6: Set Up DNS and Connect Your Domain (OPTIONAL)
- Step 7: Test Your Deployed Static Website
Introduction: In today's digital world, creating and deploying a static website has become easier than ever. Amazon S3 (Simple Storage Service) is a popular and reliable cloud storage service provided by Amazon Web Services (AWS). In this blog post, we will guide you through the process of deploying a static website on Amazon S3, allowing you to host your website with ease and scalability.
Prerequisites: Before we dive into the deployment process, make sure you have the following prerequisites in place:
An AWS account: Sign up for an AWS account if you don't have one already.
Domain name: Have a registered domain name or subdomain that you want to use for your website.
Basic knowledge of HTML, CSS, and JavaScript: Although not required, familiarity with these languages will help you customize your static website further.
Step 1: Create an S3 Bucket
Log in to the AWS Management Console.
Navigate to the S3 service.
Click "Create bucket."
Provide a unique and meaningful name for your bucket (e.g., "my-static-website").
Choose the region closest to your target audience for improved performance.
Leave the default settings as they are and click "Create bucket."

Step 2: Configure the Bucket for Static Website Hosting
Select your newly created bucket.
Click on the "Properties" tab and then click "Static website hosting."
Choose the "Use this bucket to host a website" option.
In the "Index document" field, enter the name of your main HTML file (e.g., "index.html").
Optionally, you can specify an error document for custom error pages.
Click "Save changes."

Step 3: Upload your Website Files to the S3 Bucket
In the bucket overview, click "Upload."
Add your website files by either dragging and dropping them or selecting them from your computer.

Once uploaded, make sure the file permissions are set to allow public access. Select the files and click "Actions," then choose "Make public."
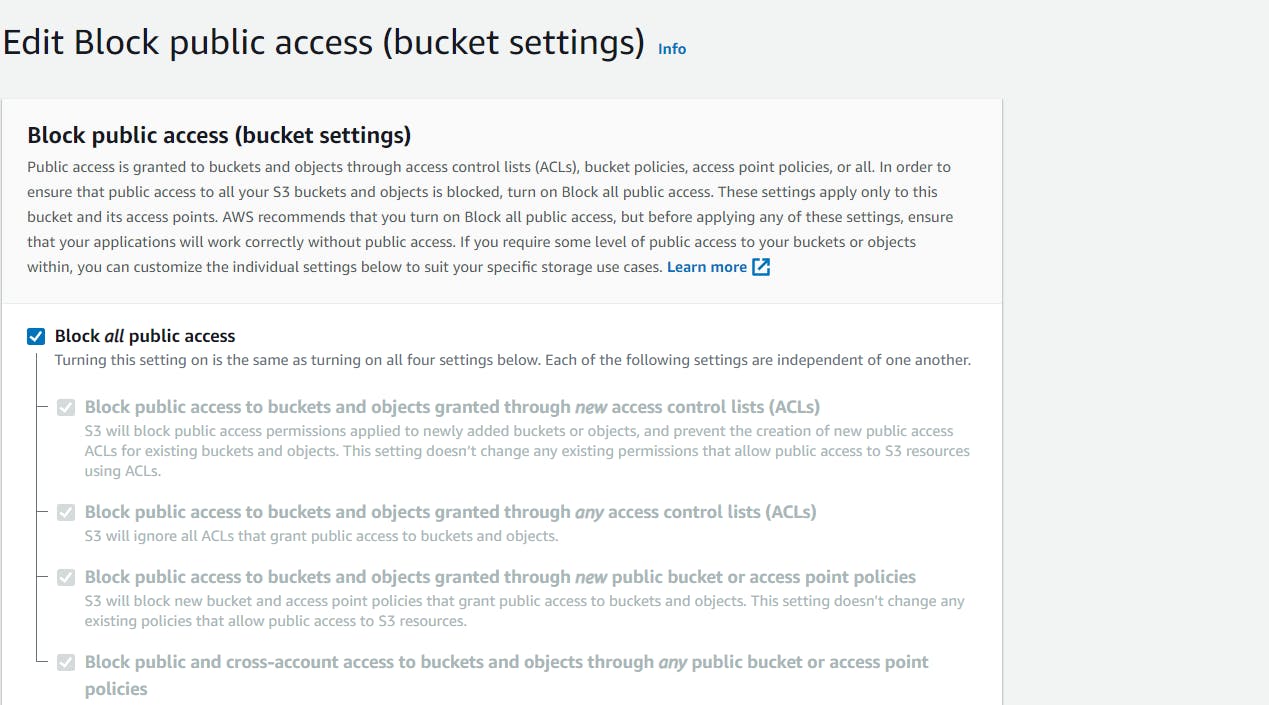
Step 4: Configure Bucket Permissions
In the bucket overview, click on the "Permissions" tab.
Under "Block public access," click "Edit."
Disable all four checkboxes to ensure your website files are publicly accessible.
Click "Save changes."
Step 5: Enable Static Website Hosting and Obtain Endpoint URL
Go back to the "Properties" tab of your bucket.
Under the "Static website hosting" section, note down the "Endpoint" URL.
This URL will serve as the public web address of your static website.
Step 6: Set Up DNS and Connect Your Domain (OPTIONAL)
Visit your domain registrar's website and access the DNS management settings for your domain.
Add a new CNAME (Canonical Name) record for your domain or subdomain.
Set the "Name" field to the desired subdomain or leave it blank for the root domain.
Set the "Value" field to the S3 bucket's endpoint URL noted in Step 5.
Save the changes and allow some time for the DNS changes to propagate.
Step 7: Test Your Deployed Static Website
Open a web browser and navigate to your domain or subdomain.
Your static website should now be live and accessible to visitors.
Conclusion: Deploying a static website on Amazon S3 is a straightforward process that provides reliability, scalability, and cost-effectiveness. By following the steps outlined in this guide, you can successfully host your website on the cloud, leveraging the powerful features and infrastructure of AWS. Now, you can focus on creating an engaging user experience without worrying about the complexities of server management. Happy hosting!